Friday, November 30, 2012

Dipped Caramel Marshmallows

I lived in a small town growing up and all of my neighbors exchanged gifts at Christmastime. One neighbor made a plate of treats every year and there would be like 2 of these marshmallows. Yummm... It's funny because I usually only like marshmallows when they are melted but these are a delicious exception! I think they are fabulous! I made them last year when I was doing a craft with some friends but completely forgot to post it! It turned out just perfect because I remembered just in time for Christmas. I bet these would be really fun to make with kids! Hope someone out there enjoys them as much as me!

Dipped Caramel Marshmallows

1/2 cup butter
1/2 can sweetened condensed milk
1 pkg. wrapped caramels, unwrap them
1 bag large marshmallows
approx. 2 cups rice krispies

1. Melt butter, sweetened condensed milk, and caramels together in a saucepan over low-medium heat.

2. Lay a piece of parchment paper to the side for the marshmallows to cool on. Then dip each marshmallow in the caramel sauce using a fork or spoon. 

3. Next, roll in the rice krispies and place on parchment paper. 

4. Refrigerate until set in sealed container. Serve at room temperature. :) 

Sunday, October 28, 2012

Moist Zucchini Bread

Tis the season for making zucchini bread. Many a garden is trying to give away a zucchini or two because somehow one plant always provides enough for a whole neighborhood! Take that zucchini and make this bread. It is quick to make and moist and satisfying. It isn't even that bad for you since you can substitute some of the oil for applesauce if you desire and there are 3 cups of zucchini in the mix! Yummm...

Zucchini Bread
Ingredients
3 cups all-purpose flour
1 tsp. salt
1 tsp. baking soda
1 tsp baking powder
3 tsp. ground cinnamon
3 eggs
1 cup vegetable oil or applesauce
2 1/4 cups white sugar
3 tsp. vanilla extract
3 cups grated zucchini (DO NOT drain the zucchini)

Instructions
1. Grease and flour two bread pans. Preheat the oven to 325 degrees F.
2. Sift flour, salt, baking powder, soda, and cinnamon together in a bowl.
3. Beat oil, eggs, vanilla, and sugar together in a large bowl. Add sifted ingredients to the mixture and beat well. (The mixture will be REALLY stiff. Don't worry, the zucchini will soften it up perfectly!)
4. Stir in the zucchini until well combined. Pour batter into prepared pans.
5. Bake for 40-60 minutes, or until a toothpick inserted near the center comes out clean.
6. Cool in pans on wire rack for about 20 minutes. Remove bread from pans and allow to completely cool on wire racks.

Makes: 2 loaves

YUMMY!!!
Share this bread with your neighbors and you are sure to make some new friends!!

Wednesday, October 10, 2012

BEST Baked Sweet & Sour Chicken

Oh my goodness! I am in shock. This recipe was incredible. I am so happy right now. Have you ever had a moment like that, where you've tried a new recipe and just hoped that it would turn out good and voila! it tueds out AMAZING and even better than you could have expected? If you haven't had that happen before then try this recipe! It will exceed your sweet and sour expectations. I promise. I got the recipe from my good friend Mel over at Mel's Kitchen Cafe, well at least we should be friends since we have almost identical taste buds! She doesn't actually know I exist but I love her blog and so we are good friends in my mind. :) If you haven't seen her blog, I recommend visiting melskitchencafe.com in the near future. You won't regret it.

 Back to the recipe, I love sweet and sour chicken but sometimes it can be soggy with the sauce or have a deep fried breading that separates from the chicken and just isn't that good. But this recipe has just the right amount of crispiness and stickiness to make you definitely put it on your list of favorite recipes. To add to the list of wonderful things, it is baked not deep fried so you are saving calories too! But enough of listening to my testimonial... go make it!


Baked Sweet & Sour Chicken
Recipe adapted from: Mel's Kitchen Cafe
For the chicken:
4-6 chicken breasts
1/2 tsp salt
1/4 tsp pepper
1 cup cornstarch
3 large eggs, beaten
1/3 cup vegetable oil

For the sauce:
3/4 cup granulated sugar
4 tbsp. ketchup
1/2 cup apple cider vinegar (I didn't have apple cider so I used white vinegar)
1 tbsp soy sauce
1 tsp garlic salt

Directions:
Pre-heat the oven to 325 degrees F.

Heat the oil in a large skillet over medium heat. And while the oil is warming up, cut up the thawed chicken breasts into approximately one inch pieces. (Try to keep them about the same size to they cook evenly.) Sprinkle the salt and pepper over the chicken pieces.

Next place the chicken into a large gallon-sized Ziploc bag with the cornstarch and toss to coat the chicken evenly with the cornstarch. Whisk the eggs in a pie plate. Next, dip the cornstarch-coated chicken in the egg and place them, a few at a time, carefully in the oiled skillet.

Cook until lightly browned on each side. (Don't cook all the way through because they will finish cooking in the oven.) Place chicken in a 13x9 in. baking dish in a single layer.

Mix the sauce ingredients together in a medium bowl and pour evenly over the chicken in the dish.

Bake for one hour. Turn the chicken a couple times during the cooking process to make sure it is evenly coated.

Serve over hot rice and a side of broccoli. Yummm!!!

It is so hard for me to remember to take a picture before I have almost finished eating!

Enjoy!


Thursday, October 4, 2012

Baked Spaghetti Pie

This is another recipe I got from my Grandma Billie. I love her cooking in case anyone following the blog hasn't noticed. There will be more Grandma Billie recipes to come that you won't want to miss so stay tuned!

Baked Spaghetti Pie is the perfect recipe for a crowd. It serves about 12 to 15 people. And I love it for it's cheesy goodness. Yummm... To prove how delicious it is, the first time I made it I couldn't even get a picture taken before it was almost gone! There was only one corner left and so I had to make it again to get a picture of the whole pan. :)

Serve this meal with a green salad on the side and maybe some fruit for dessert and you have a delicious and nutritious meal for a crowd! Enjoy. :)


Baked Spaghetti Pie

Ingredients
1 1/2 lbs. ground sausage
1 large onion
1 32 oz jar spaghetti sauce
1 cup water (I used less water)
1 lb spaghetti, cooked and rinsed
1/2 stick butter
3 eggs beaten
16 oz shredded mozzarella cheese
8 oz grated Parmesan cheese
16 oz cottage cheese


Directions:
1. Preheat oven to 350 degrees and grease an 11x13 casserole dish with cooking spray.

2. Dice onion. Brown sausage and onion in a large frying pan. Drain the grease.

3. Add spaghetti sauce and water. Simmer until thick. (Approx. 20 min.)

4. In a separate large mixing bowl, toss cooked spaghetti with butter, eggs, Parmesan cheese, and 1/2 of the mozzarella cheese until well mixed.

5. Spoon spaghetti and cheese mixture into the bottom of your greased baking dish and press down. Cover with an even layer of cottage cheese. Last, spoon spaghetti sauce on top. Press the sauce down into the noodles. Now poke holes with the bottom of a wooden spoon to get the sauce to go down into the noodles a little bit. (It makes a full pan of spaghetti pie. This helps it all fit in the pan better!)

6. Bake for 20 minutes. Remove from the oven and cover with remaining mozzarella cheese. Return to oven and bake for about 15 more minutes, or until cheese is golden and bubbly. Cool about 10 minutes before serving.   


Here is one last look!

Monday, October 1, 2012

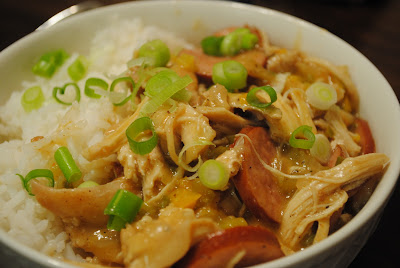
Chicken & Andouille Gumbo

This was such a fun recipe to try. I have never really tried making Southern food but I had a roommate who made really good red beans and rice and other really good Southern foods. So when I was looking through one of my Taste of Home magazines and came across this gumbo I knew it was the next creation that needed to be on the blog! Yummy!!

It is a very simple recipe. What took the most time was simply cutting up the ingredients. It can be modified to fit your taste buds. If you love hot cajun style food then go ahead and add more cajun seasoning however if you are like me and don't like the heat to overpower the food then feel free to use less seasoning. I actually made my own cajun seasoning because they didn't have it at the grocery store so I will include the ingredients to the homemade seasoning as well.

Another good thing about gumbo is it freezes well. So I froze about 1/3 of the pot so it didn't go to waste. :)


Chicken & Andouille Gumbo
Recipe adapted from: Taste of Home Magazine June/July 2012
2 tbsp. Cajun seasoning, divided  
1 tsp. salt, divided
1/2 tsp. pepper, divided
3 lbs. bone-in chicken thighs, skin removed  (I used 1/2 chicken breasts and 1/2 thighs)
1/2 cup plus 2 tbsp. canola oil, divided
1/2 cup all-purpose flour
1 large onion, finely chopped
3/4 cup finely chopped green pepper
3/4 cup finely chopped sweet red pepper (mine was a yellow pepper)
3 celery ribs, finely chopped
4 garlic cloves, minced
4 cups water
2 cups chicken stock
1 1/2 lbs. fully cooked andouille sausage links, sliced
2 tbsp. Worcestershire sauce
2 bay leaves
Hot cooked Rice
3 green onions, chopped

Homemade Cajun Seasoning: (Makes 2 tbsp.)
1 tsp. onion powder
1 tsp. garlic powder
1 tsp. black pepper
1 tsp. ground red pepper
1 tsp. paprika
1/4 tsp. salt
3/4 tsp. oregano

1. In a small bowl, mix 1 tbsp. cajun seasoning, 1/2 tsp. salt, and 1/4 tsp. pepper; rub over chicken. In a dutch oven or large 5 qt. pot, brown (not fully cook) chicken in 2 tbsp. oil in batches; remove chicken from the pan.

2. Add remaining oil to the same pan; stir in flour until blended. cook and stir over medium-low heat for 30 minutes or until browned. (Do not burn!) Add onion, peppers and celery; cook and stir for 2-3 minutes or until vegetables are tender. Add garlic; cook 1 minute longer.

3. Gradually add water and stock. Stir in sausage, Worcestershire sauce, bay leaves, chicken and the remaining Cajun seasoning, salt, and pepper. Bring to a boil. Reduce heat; cover and simmer for 1 hour or until chicken is very tender.

4. Remove chicken from pan; cool slightly. Skim fat from soup and discard bay leaves. Shred chicken and return to soup; heat through. Serve gumbo over rice; top with green onions.

Enjoy!

Sunday, August 5, 2012

Cheesy Chicken Taco Pasta


Yumm. Yumm. Yummm... I love to cook. Yesterday I was asked what my favorite food was and I thought, wow that is a hard question! Glad no one ever asked me that in an interview because I would have FROZEN. The pressure! How do I pick ONE favorite food. Whew... after a couple hours I came to the conclusion that probably a steak and a potato would be my favorite. But, that has nothing to do with this post because this is a chicken post. Cheesy Chicken Pasta! Maybe you have noticed that I am not one for hot food so if you are, then jump at the chance because this is probably as spicy as things will get on this blog. :)
And since I am in the middle of a move why don't we just cut to the chase and let you see the pictures and the recipe. It is delicious and if you like chicken and pasta... well then you have found a winning recipe!
Ready for the oven!

Cheesy Chicken Taco Pasta
Credit given to: Eatcakefordinner.com for the delicious creation!
1 1/2 - 2 c. cooked and seasoned chicken, diced
2 c. shell pasta, cooked (measure before it is cooked)
1 3/4 c. Cheddar cheese, divided (I used Mozzarella)  
1 (10 3/4 oz.) can cream of chicken soup
1 can mild Rotel, undrained (diced tomatoes and green chiles)
3/4 tsp. cumin
1/2 tsp. chili powder
salt and pepper
2 - 3 Tbl. chopped cilantro, opt. *I am not a cilantro fan but I added it and it was great!*
1/4 c. milk
Directions:
Combine cream of chicken soup, Rotel, cumin, chili powder, salt, pepper, chopped cilantro and milk.  Add the cooked chicken, cooked pasta and 1 1/4 cups of cheese.  Stir to combine. Now add your splash of milk. Taste and add more seasonings if you desire.  Pour into an 8x8 inch casserole dish.  Top with remaining 1/2 cup of cheese.  Bake at 350 degrees for 20 minutes or until bubbly and cheese is melted.  Serves: 4-5 


Thursday, June 28, 2012

Zesty Pizza Crust

I thought after I finished school that life with a newborn would slow down but... I was wrong! Life is so busy. Yesterday I was looking for a quick pizza crust recipe to be ready before my husband got home from work and allrecipes.com didn't fail me. I figured if over 1,000 people had tried it and liked it I probably would too! 

The one thing I have to add to this recipe is a secret I learned from my husband. When he was in high school he worked at a pizza place and when he took me there for the first time I loved it! When I asked what the secret was... my husband said, "ranch seasoning powder." They sprinkle ranch powder on the crust before it's cooked and it is delicious! Go ahead, on a day you are pressed for time but still want pizza... try this crust with some ranch seasoning powder and enjoy! :)

Zesty Pizza Crust
  • 1 (.25 ounce) package active dry yeast
  • 1 teaspoon white sugar
  • 1 cup warm water (110 degrees F)
  • 2 1/2 cups all-purpose flour
  • 2 tablespoons olive oil
  • 1 teaspoon salt
  • 2 tbsp. butter, softened
  • 2 tbsp. Hidden Valley Seasoning Mix

Instructions
  1. Preheat oven to 450 degrees F.
  2. In a medium bowl, dissolve yeast and sugar in warm water and let stand until creamy, about 10 minutes.
  3. Stir in flour, salt and oil. Knead until smooth. Let rest for 5 minutes.
  4. Turn dough out onto a lightly floured surface and pat or roll into a round. Transfer crust to a lightly greased pizza pan or stone. Spread the crust with the softened butter and sprinkle the ranch powder on top. 
  5. Bake crust for 5 minutes before adding toppings. Remove from oven.
  6. Spread with desired toppings and bake for another 15 to 20 minutes, or until golden brown. Let baked pizza cool for 5 minutes before serving.


Tuesday, June 26, 2012

Creamy Yogurt Jell-O Salad

In the summer it is so nice to eat cool and creamy things and I love a good fruit salad with my dinner. This one is so creamy and light you might catch yourself eating a few too many helpings! The ingredients compliment each other so well and best of all it can be made ahead of time. Enjoy! :)


Creamy Yogurt Jell-O Salad
1 large container strawberry yogurt (any variety works)
1 tub Cool Whip, thawed
1 small box Jell-O cheesecake pudding
2 cups mixed fresh or frozen fruit
 (I used fresh raspberries and strawberries) 
INSTRUCTIONS:
Empty yogurt and Cool Whip into large mixing bowl. Fold together until evenly blended. Next, sprinkle dry pudding mix into the yogurt/Cool Whip mixture. Lastly, add fruit and mix together and refrigerate until serving. Yummm!!!


Friday, June 22, 2012

The Best Brownie Trifle


This trifle was served at our wedding luncheon. For a wedding gift the lady that catered the luncheon gave us a trifle bowl and the recipe to this delicious dessert! Yummm... We have had it quite a few times over the past 2 years because it is chocolate at its finest. Plus it is easy. No need to have any decorating skills just layering skills. So let's get to it!

The Best Brownie Trifle

1 box Duncan Hines Milk Chocolate Brownie Mix 
(Prepared "cake-like" with 3 eggs)
1 large pkg. chocolate Jell-O pudding, prepared and refrigerated
1 large container Cool Whip, thawed
1/2 pkg. Heath toffee bits

HOW-TO PREPARE
* Prepare the brownies as directed on the box and allow to cool completely.
1. Cut up the brownies into one inch cubes and break apart in pan. Place about 1/2 of the brownie cubes on the bottom of the trifle bowl. This is your first layer.
2. Spread 1/2 of the prepared pudding over the brownie cubes.
3. For the third layer, spread 1/2 of the Cool Whip over the pudding.
4. Finally, sprinkle desired amount of toffee bits over the Cool Whip.
* To finish the trifle simply repeat steps 1-4! Voila!

And here I am... eating it! 

Tuesday, June 19, 2012

BBQ Meatballs


Just wanted to prove that I still can cook! I was looking back on my previous posts and I haven't posted a main dish since Luke was born... and well, that has been 5 months next week! I am going to do better with that. In fact, I have set a goal to make 2 posts a week for right now. One every Tuesday and one every Thursday. So stay tuned for some delicious recipes to come. :)

These BBQ Meatballs came from The Pioneer Woman. She is an amazing cook and has a great sense of humor. I love reading her blog posts and looking at her cookbooks. Have I mentioned how much I LOVE cookbooks?? But not just any cookbook, the ones with pictures! Yummmm... Well, she takes wonderful looking pictures that make me want to try every last one of her recipes. I have a link up on the top right to her cookbook just so you all can see what I am talking about! If you get the cookbook, you will love it too!
BBQ Meatballs 

FOR MEATBALLS 
1-1/2 pound Ground Beef
3/4 cups Old-fashioned Oats
1 cup Milk
3 Tablespoons Very Finely Minced Onion
1-1/2 teaspoon Salt
Plenty Of Ground Black Pepper, to taste

_____
FOR COOKING MEATBALLS
1 cup All-Purpose Flour (coating For Frozen Meatballs)
Canola Oil

_____
FOR SAUCE
1 cup Ketchup
2 Tablespoons Sugar
3 Tablespoons white vinegar
2 Tablespoons Worcestershire
4 Tablespoons (to 6 Tablespoons) Onion
 HOW-TO PREPARE
* Preheat oven to 350 degrees.

* Combine all meatball ingredients. Roll into medium-small balls and place on a cookie sheet. Place sheet in freezer for five minutes.

* After 5 minutes, remove meatballs from freezer and immediately dredge in unseasoned flour.

* Brown meatballs in canola oil until just brown. Place into a baking dish.

* Combine all sauce ingredients. Pour over meatballs and bake at 350 degrees for 45 minutes.

* Serve with egg noodles, mashed potatoes, or crusty French bread.


Tuesday, June 5, 2012

Oreo Cheesecake Cupcakes

What if I said that I really don't like Oreo's? Would anyone believe me?? Probably not. I really don't like Oreo's plain but I LOVE Oreo's in things. Yummm... Oreo cheesecake, Oreo shakes, Oreo salad, etc. Yes, that is when I love Oreo's. I found this recipe on Pinterest. I love Pinterest. I have found so many delicious recipes that I could spend the next year just making them and not run out of things to make. Every recipe I have made from Pinterest I have loved, and this recipe for Oreo Cheesecake Cupcakes is one of them. :)


Oreo Cheesecake Cupcakes
Recipe adapted from: catesworldkitchen.com
25 Oreo cookies: 18 whole, 7 crushed 
2 pkg. cream cheese, softened
1/2 cup sugar
1 tsp. vanilla extract
2 large eggs, room temperature, lightly beaten
1/2 cup sour cream
Pinch of salt

Now for the How-To:  
1. First, preheat oven to 275 F and line 18 regular muffin cups with paper liners.
2. Place 1 whole Oreo in the bottom of each lined cup.
3. Beat the cream cheese in a mixing bowl on medium speed. While you are mixing, slowly beat in the sugar and vanilla. Next, pour in the beaten eggs, a little at a time, scraping down the sides of the bowl after each addition. This helps to make sure everything is evenly incorporated.
4. Now, beat in the sour cream and salt. Then, stir in the leftover chopped Oreo's by hand. 
5. Pour the batter evenly into the prepared tins. 
6. Bake, rotating pan halfway through, until filling is set, 22-25 minutes. 
Cool in pans for about 15 minutes on a wire rack, then let cool on a plate in the refrigerator for 4 hours.
After they have cooled, you can either eat them as is, or you can drizzle a little melted chocolate on top. Either way you decide is absolutely delicious!
 ENJOY!!

Monday, May 7, 2012

Avocado Smoothie

For those of you who have followed my blog since the beginning you probably have noticed that I have posted a few recipes I learned while on my mission in Brazil. This is another one of those recipes. I was first introduced to avocado smoothies in the MTC in Brazil. My teacher took us to a little corner shop that made smoothies of every fruit imaginable. He recommended the avocado smoothie. I thought to myself... "this is probably going to taste like guacamole in a glass!" But I gave it a try. And what do you know, I liked it! And today I would like to share this simple and delicious creation with you. :)


Avocado Smoothie
1 avocado 
(if you want tips on how to choose an avocado leave a comment) 
1 large banana
2 cups milk
3 Tbs. sugar
1/2 tsp vanilla extract (optional)

Remove the pit and skin from the avocado and place it in a blender. Now add the banana. Pour approximately 2 cups of milk in as well. (You can adjust the milk. If you like thicker smoothies add less milk, thinner smoothies add more.) Lastly, add the sugar and vanilla. (The vanilla is an addition Dustin and I like but not included in the traditional Brazilian avocado smoothie.) Blend until smooth and serve immediately! 
The end!


Wednesday, May 2, 2012

Nutty Granola


I love granola. Yumm... Yumm... Yumm... After I had Luke my Grandma Billie came to visit and she brought me some granola and I ate it every morning until it was gone. Then a couple months later she came again and brought some more and once again... I ate it every morning until it was gone. This is good granola people! Best part about it is it gets me to eat some oats! And don't worry if you are the type that needs to have fruit in the morning... just throw some berries on top and some milk and it is delicious! Or if you are the yogurt in the morning type... just sprinkle a little on top and you have a nice extra little crunch! Or just eat it as a snack whenever you want. Just eat it. Because it is good!

Nutty Granola 
6 cups old fashioned oats
1 cup slivered almonds, cashews, or pecans. (Or just mix a little of all three!)
1 cup butter-- 
**don't worry the butter is covering 6 cups of oats so each serving won't have any more than what you would spread on a piece of toast**
1 cup brown sugar
1/2 tsp cinnamon (optional)
Variations: sunflower seeds, flax seed, coconut, craisins/raisins.

1. Put the oatmeal, nuts, and coconut (optional) in a large mixing bowl. 
2. In a saucepan over medium-low heat melt the butter and brown sugar until the mixture is melted together. Pour over the oats and nuts until well coated. 
3. Pour evenly on a lightly greased cookie sheet.
4. Bake at 350 degrees for 12 minutes.
5. Remove from oven and stir the granola. Bake for another 12 minutes.
6. Let cool on the pan for 10-15 minutes.
7. Store in an airtight storage container after granola has completely cooled.


Monday, April 30, 2012

Chocolate Covered OREO Cake

I would just like to start by saying that this cake is DIVINE! Yummm... I wasn't expecting it to be SO good! I mean I knew it would be good... but I didn't know it would be SO good! I have a feeling it will become a regular go-to party cake at the Hanson home. :)
I try to post recipes that I feel are simple and delicious. I have watched cooking shows that make recipes that would take a day and a half to finally make... and who really has time for that! So, if you are looking for a good dessert that doesn't take much time and ends up looking and tasting wonderful... this is it! I almost made the whole thing during Luke's nap! Give it a try, you will love it.

Chocolate Covered OREO Cake
Recipe from: Kraft Kitchens

 
1 pkg. devil's food cake mix (I used triple chocolate fudge)
4 squares BAKER'S Semi-Sweet Chocolate (Or you could use about 1/2 cup semi sweet chocolate chips)
1/4 cup butter
1 pkg. (8 oz.) Cream Cheese, softened
1/2 cup sugar
2 cups thawed COOL WHIP Whipped Topping
12 OREO Cookies, coarsely crushed
 
Preheat the oven to 350 degrees.
 
Prepare cake batter according to box instructions and divide evenly between two 9'' cake pans. Cool cakes for about 10 minutes in the pans and then remove from pans to cool completely on wire racks.
 
Microwave the chocolate squares and butter (approx. 1 min)  in a bowl and stir until the chocolate is completely melted. Set aside and allow to cool. This will be the frosting for the cake.
 
In a separate bowl, combine softened cream cheese and sugar. Beat until smooth. Scrape the sides to make sure all the sugar is incorporated. Add the crushed OREO's to the cream cheese mixture and stir until blended. Now, gently add the Cool Whip to the mixture. This is the filling for the cake.
 
Finally, to put your cake together. Start by placing one chocolate cake layer on a plate. Spread the cream cheese mixture on top of the layer. Now place the second chocolate cake layer on top. Last of all take the chocolate icing and spread on top to finish off your chocolate covered OREO! 
 
Refrigerate until serving and also keep the leftovers refrigerated... if you have any! :)


Sunday, April 15, 2012

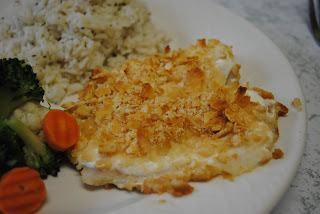
Baked Tilapia Filets

I'M BACK!!!
 I am back and ready to highlight one of our favorite family recipes. Baked Tilapia Filets. :) This recipe came from a "Celebrations" cookbook. Apparently it is perfect for the spring season but for us... it is delicious year round! I love to serve it with rice seasoned with parsley, rosemary, basil, and any other seasoning that sounds good and some vegetables. It is so easy and quick so if you are in a hurry and want a delicious, nutritious, and quick meal... this is the meal for you!

Baked Tilapia Filets
3 frozen tilapia filets, thawed
1 cup plain yogurt 
(I used one individual cup of Chobani Greek Yogurt) 
1/2 sleeve of Ritz crackers, crushed
*Optional: Add any desired seasonings to the crackers or yogurt such as:
rosemary, garlic powder, pepper. 

1. Preheat oven to 450 degrees. 
2. Coat each side of the filet with the yogurt.
3. Now dip each filet and cover with the crushed Ritz crackers.
4. Place each filet on a well-greased baking sheet.
5. Place in the oven to cook for 10-15 minutes. 
     - The fish is done when white and the crackers will be lightly browned.
6. Done! Now serve with some seasoned rice and vegetables and ENJOY!


Saturday, January 14, 2012

Brazilian Chicken Stroganoff

This has to be one of the best recipes that I picked up from Brazil. It is so different, easy, and delicious. It is one of Dustin's favorite meals. I need to learn how to take better pictures with my camera because the pictures don't do the recipe justice. One of the interesting things about Brazilian cooking is that no one really uses recipes. I wanted to have the recipe and everyone would tell me "a little bit of this and a little bit of that." Which means that this is my own personal recipe because everyone makes it different. I hope you try it! :)


Brazilian Chicken Stroganoff
1 large chicken breast, boiled in salted water and shredded
1/2 medium onion, diced in small pieces
1 tbsp olive oil
2 cloves of garlic, diced
1 tomato, diced
1-2 tbsp Ketchup
1 1/2 cups heavy cream
2 tsp cornstarch
salt and pepper to taste
Cooked Rice

1. Start boiling water in a medium pot and when the water comes to a boil add the chicken breast and let it cook through until it is all white and then shred the chicken with two forks.
2. In a separate skillet over medium heat add the olive oil and let it warm. Add the diced onion and stir until they soften. Then add the garlic and let the two cook together for a couple minutes. 
3. Add the shredded chicken and stir all together. Then add the diced tomato and mix all together.
4. Now add the magic Ketchup ingredient and stir all together.
5. In a measuring cup add the heavy cream and the cornstarch and wisk all together so there are no lumps and then add to the skillet over the chicken mixture. Let it all warm together stirring frequently. When it starts thickening up turn the heat down and add salt and pepper to taste. When you have it the way you want it. Turn off the heat.
This is how it will look in the pan. :)

Serve this delicious stroganoff sauce over cooked rice and Enjoy!!